Interlaced high refresh rate CRT gaming and GPU prioritization for interlaced output on Windows 11
Hi everyone! Today we're having a look at how to do proper interlaced CRT resolution and signalling under Windows 11, compatible even with latest generation modern GPUs like the 40XX series Nvidia and 79XX AMD series GPUs and above.
How it works
It's really simple: use an AMD GPU (on the R9 3XX series at maximum) with a proper interlaced DVI-I output, which is the only one that works under Windows 11 without problems. I previously tried to make it work under Windows 11 with a GTX Titan X (the fastest GPU available now with a native analog output, since 2015) and even with using older drivers it simply doesn't work anymore like it used to.
The "output" GPU
I picked up an used R9 380X, Sapphire branded, put it to the test using memtest_vulkan and made sure it worked under load, and installed the latest drivers available as of today, which are from late 2022, from the official website. This GPU will be used exclusively for outputting to the display.
The rendering GPU
I had available the Titan X I already bought for that (and failed), and I will use it as the primary GPU for rendering. You simply install the latest drivers available for it and you're ready to rock!
Any GPUs will be good for that one, but I think you need to go for a Nvidia or Intel ARC GPU because AMD drivers (the ones for the "output" GPU and the ones for the "rendering" GPU) cannot be installed in tandem and will conflict for sure, maybe they will even uninstall the old one for the new one by themself and thus breaking compatibility with this method, so... you're advised!
The setup
Connect the output cable for the monitor to the "output" GPU.
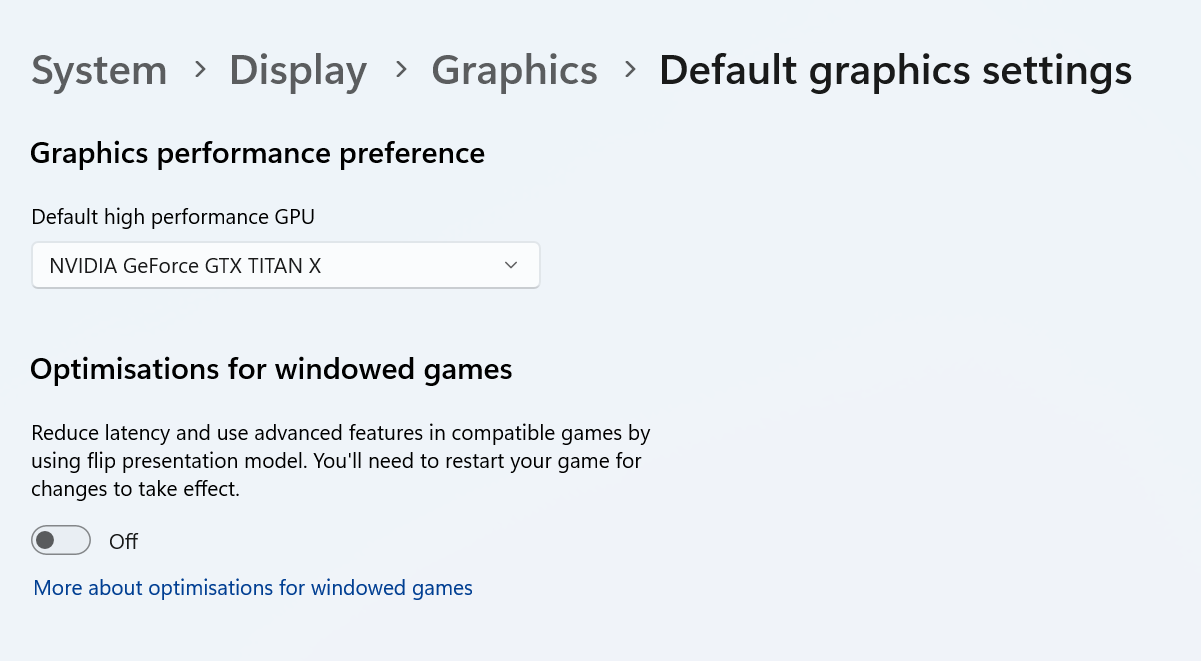
Once you have Windows 11 installed, with the two GPUs properly configured, you just have to open the Settings app and go under Settings > Display > Graphics, under Default settings you click on "Change default graphics settings" and under "Graphics performance preference", at the Default high performance GPU you make sure to select the GPU installed for rendering purpose, in my case it's the Nvidia GeForce GTX TITAN X.


Note: As you can see, if you don't do that, it can (and probably will) guess the "rendering" GPU and use the "output" GPU as the rendering one too!
Reboot and have fun!
Bonus: If your monitor doesn't show up the full resolution of your display
If you have problems showing up with the full resolution and refresh rate of your monitor, like I do with my LaCie Electron Blue II which doesn't show either full resolution (2048x1536) nor interlaced signals in the dropdown list of refresh rates available, you can install and run CRU utility here.
Once downloaded and extracted, you run CRU.exe and select you display defined as (active) on the dropdown selector.
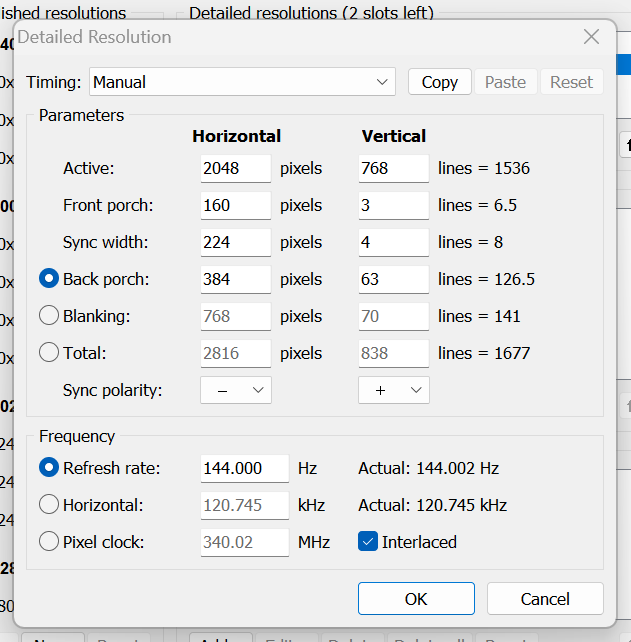
Now, you create a custom resolution by clicking the "Add..." button and it will open up this view, in which you can edit your display properties, e.g.:


(You can find how to properly tune your display online on YouTube!)
Once you have setup a display resolution, save with the OK button and click OK in the main window to save and close the edits made.
To apply the resolutions and make them available to Windows, you need to run restart64.exe available in the same folder as the downloaded CRU executable, then exit from it and you can then find the setup resolutions you just made available under Windows display settings!
Conclusions
It has worked for me very well, and gaming on a CRT display with interlaced signal and full resolution has been a blast since discovering this method! I hope it will help you too and save you some time too!
Now, happy gaming everyone!

If you fancy see what I'm working on, have a look at my GitHub or write me an email!
